Expense Tracking in Money Pro
How Money Pro automatically tracks, categorizes, and reports your business expenses — and how to keep your books accurate year-round.
Overview
Expense tracking is the heart of Money Pro. Every time you spend money on your business — a software subscription, office supplies, a client lunch, a flight to a conference — that expense needs to be recorded and categorized so it's ready for tax time. Money Pro automates the tedious part.
When you connect your bank account, Money Pro pulls in your transactions and categorizes them automatically based on merchant name and transaction type. The categories it uses are IRS Schedule C categories — the same ones you (or your accountant) use to report business expenses on your tax return. Advertising, Office Expenses, Business Meals, Travel, Software & Subscriptions — each expense lands in the right bucket without manual sorting.
That said, no automatic system is 100% accurate. A restaurant might be a business meal or a personal dinner. A hardware store purchase might be a legitimate business supply or something personal. Your job is to periodically review the transactions Money Pro categorized and correct anything that's wrong. Money Pro learns from your corrections and applies the same rule automatically going forward — so you correct most merchants once.
Good expense tracking habits pay off in two ways: a clear picture of where your money goes throughout the year, and clean organized records at tax time that your accountant can use instead of a shoebox of receipts.
How Automatic Categorization Works
When a transaction posts to your linked bank account, Money Pro:
- Receives the transaction via your Plaid connection (after the transaction fully posts — typically 3–5 business days after the purchase)
- Identifies the merchant using the transaction description
- Assigns a category based on merchant type (e.g., Southwest Airlines → Travel, Amazon Business → Office Supplies)
- Applies any expense rules you've set — if you previously changed a merchant's category, that rule fires automatically on future transactions from the same merchant
- Flags uncertain transactions for your review if it isn't confident in the categorization
IRS Schedule C Categories
Money Pro uses IRS Schedule C expense categories because those are the ones that matter for your taxes:
| Category | What It Covers |
|---|---|
| Advertising | Marketing, online ads, printing, promotional materials |
| Car and Truck Expenses | Actual vehicle costs (separate from mileage deduction — use one or the other) |
| Commissions and Fees | Payments to contractors and freelancers |
| Insurance | Business insurance premiums |
| Meals | Business meals with clients (50% deductible at tax time) |
| Office Expense | Supplies, postage, small equipment |
| Professional Fees | Accountant, lawyer, consultant fees |
| Rent or Lease | Office space, equipment rentals |
| Software & Subscriptions | SaaS tools, software licenses |
| Travel | Airfare, hotels, transportation for business travel |
| Utilities | Business phone, internet, utility bills |
| Other Business Expense | Legitimate business expenses that don't fit a named category |
Custom subcategories: You cannot change the main IRS parent categories (they're tied directly to Schedule C), but you can create subcategories under any parent. For example, add "Etsy Account" as a subcategory under "Advertising." Go to Expenses → gear icon → Business Categories → + Add to create one.
Tax note: Business meals are generally 50% deductible. Money Pro tracks the full amount. The 50% limitation is applied at filing time by your tax software or accountant — don't halve the amount before entering it.
Reviewing and Categorizing Transactions
The Deduction Finder
After your bank connects, use the Find Deductions button to quickly process your initial batch of transactions:
- Go to the Expenses page and click Find Deductions
- Money Pro scans all your transactions and groups them into three buckets:
- Very Likely — transactions that are clearly business expenses
- Not Likely — transactions that appear personal
- Needs Review — transactions where it's unclear
- Review each group and confirm or override in bulk
- For Needs Review items, take time to evaluate each one
If most of your expenses are already tagged, Find Deductions may not find anything new.
Categorizing Individual Transactions
- Click on any transaction to open it
- Click the current category label and select the correct category from the dropdown
- When prompted with a "Suggested Rule" banner, click "Review Now" and accept it to automate that category for all future transactions from that merchant
- Add a Note for any transaction that might look questionable in an audit (e.g., "Client dinner — John Smith, ABC Corp")
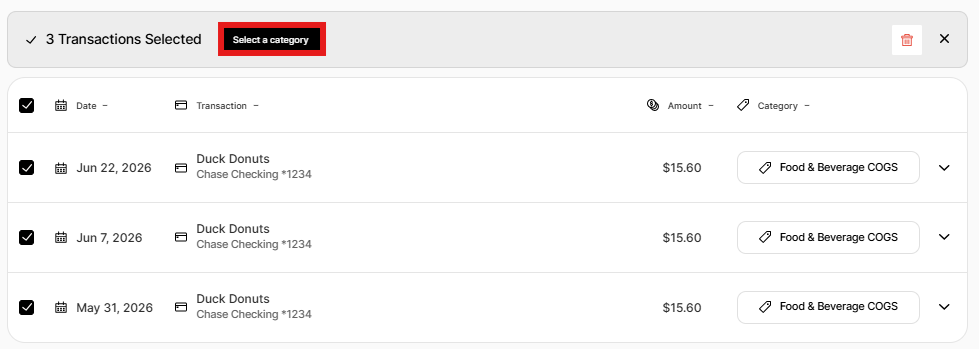
Bulk Recategorization
- Filter the Expenses view by date range, account, or category
- Click Bulk Select and check the transactions you want to change
- Select the new category and confirm
Splitting a Transaction
If a single purchase contains both business and personal items (e.g., you bought office supplies and personal items in the same Target run):
- Open the transaction
- Click Split instead of Business or Personal
- Enter the dollar amount that is business and the dollar amount that is personal
- Save — each portion is categorized and reported separately
Adding Manual Transactions
Money Pro only tracks what flows through your linked bank accounts. For cash purchases, expenses from accounts you don't want to link, or expenses paid from a personal card:
- Go to Expenses → click "Add Expense"
- Enter: date, vendor, amount, business/personal status, category, which business, client (optional), bank account, notes, and whether it's recurring (one-time, weekly, monthly, or yearly). To attach a receipt, do so after saving from the web dashboard (receipt upload is not available in the mobile app, but it works from a mobile web browser).
- Click Save Details
Income Tracking
The Income page mirrors the Expenses page for deposits. When money is added to your linked accounts — client payments, transfers in, refunds — it appears as income for you to tag as business or personal.

Automatic invoice matching: When a client pays an invoice through Money Pro, the deposit syncs from your bank and appears on the Income page. You can also manually match a deposit to an invoice from the Invoice Dashboard — open the invoice, click Add Bank Transaction, and select the matching deposit.
Income rules work like expense rules: click an untagged deposit, select "Create rule," and Money Pro will automatically tag future deposits from the same source.
Manually add income: Go to Income → "+ Add Income" and enter the date, source, amount, business/personal status, business name, bank account (optional), and any notes.
Receipts and Documentation
Attaching receipts to transactions protects you in case of an IRS audit.
From the web (only — not available in the mobile app):
1. Open the transaction → click + Add a Receipt
2. Upload a photo or PDF
When you export the Expense Detail List Report, there's a "Receipt" column with a link to each uploaded receipt.
Expense Rules
Expense rules automate your tagging by remembering your categorization decisions:
- When you categorize a transaction, Money Pro may show a "Suggested Rule" banner — accept it to apply the rule to all future (and optionally past) transactions from that merchant
- Rules can set: category, business vs. personal tag, which business, and which client
- To manage rules: gear icon → Business Categories or review them as they're suggested during categorization
Owner's Draws vs. Business Expenses
The most common categorization mistake for LLC owners:
Business expenses are operating costs — deductible, reduce taxable income.
Owner's draws are money you take from the LLC for personal use — NOT deductible, not a business expense. You're taxed on your LLC's net profit regardless of whether you take draws.
If you categorize owner's draws as business expenses, you overstate your deductions and create audit risk.
In Money Pro: When you see a personal withdrawal or a personal purchase accidentally paid from the business account, categorize it as Owner's Draw or Personal — not any business expense category.
Deleting and Restoring Transactions
Deleting transactions: Deleted transactions are moved to the Archived section — they are not permanently erased. They can be restored at any time.
When to delete: personal transactions mistakenly imported, incorrect CSV imports, or duplicate entries.
To delete:
1. Navigate to the Transaction Dashboard (Expenses or Income)
2. Click on the transaction → select Delete → confirm
3. For bulk deletion: click Bulk Select, choose transactions, click the Trash icon
4. Note: bank transfers cannot be bulk deleted — they must be deleted individually
To restore:
1. Go to Expenses or Income → click the Type Filter → select Archived
2. Find the transaction → click it → select Restore → confirm
3. Bulk restore is also available from the Archived view
Special cases:
- Deleting a bank transfer creates an "orphaned" transaction in the other account — reclassify it as Member's Capital or Member's Draw to clean it up
- Deleting tax payments affects your estimated tax liability calculations — review carefully first
Expense Reports
To access reports: Expenses → gear icon → View Reports
Available reports:
- Business Expenses by Business
- Business Expenses by Category
- Business Expenses by Vendor
- Business Expenses by Client
- Expense Details List with Receipts (includes receipt links)
- Personal Expenses by Category
- Personal Expenses by Vendor
- Total Expenses from Recurring Vendors
Common Mistakes to Avoid
- Mixing personal and business accounts — Dedicate your business accounts to business only; it eliminates most categorization work
- Leaving transactions uncategorized — Uncategorized transactions are excluded from expense reports and tax estimates
- Forgetting cash purchases — Add them manually via "Add Expense"
- Not attaching receipts — Especially for meals, travel, and equipment over $75
- Importing CSV without reviewing — Always review imports for mapping errors and duplicates
- Not using expense rules — After categorizing a merchant once, set a rule so you never have to do it again
Frequently Asked Questions
How often do transactions sync from my bank?
After transactions fully post to your bank, they appear in Money Pro within 3–5 business days. Banking holidays can add an extra day. If transactions from more than 5 business days ago aren't showing up, contact our support team — there may be a connection issue.
Can I add a transaction that isn't in my bank account?
Yes. Go to Expenses → Add Expense and fill in the details manually. This is useful for cash purchases, or expenses paid from an account you don't want to link.
What if a transaction includes both business and personal spending?
Use the Split feature. Click the transaction, select Split instead of Business or Personal, and enter the dollar amount for each portion. Each portion is then categorized and reported independently.
What is the Deduction Finder?
The Deduction Finder scans all your transactions and groups them into "Very Likely" business, "Not Likely" business, and "Needs Review" buckets. You then confirm or override each group in bulk. It's the fastest way to process a backlog of uncategorized transactions after your initial bank connection.
Does Money Pro separate personal and business expenses automatically?
Only if your account type is set to Business Only — then all transactions from that account auto-tag as business. With Mixed Use accounts, you review and tag each transaction manually. Keeping dedicated business accounts (set to Business Only) eliminates most manual work.
Can I create custom expense categories?
You can create custom subcategories under the main IRS Schedule C categories. For example, "YouTube Ads" as a subcategory of "Advertising." You cannot change or remove the parent IRS categories themselves — they're tied directly to Schedule C. To add: gear icon → Business Categories → + Add, enter the name, select the parent category, and save.
I deleted some transactions by mistake. Can I get them back?
Yes. Deleted transactions go to the Archived section, not permanent deletion. Go to Expenses → Type Filter → Archived, find the transactions, and click Restore.
My expenses aren't showing up. Where did they go?
First check your filters — the date range on the Expenses page might be set too narrow. Change it to "All time." Then use the search field. If you still can't find them, check Archived transactions — you may have accidentally deleted them. If the transactions truly didn't sync, verify your bank connection in Banks & Integrations.
Does Money Pro handle payroll expenses?
Money Pro doesn't integrate directly with payroll software. However, if you pay employees or contractors from a linked bank account, you can tag those transactions as Payroll or Contractors in Money Pro so they're captured in your expense reports and tax estimates.
How do I track 1099 income from Upwork, Fiverr, or other freelance platforms?
When the platform deposits a payout into your linked bank account, Money Pro syncs the deposit automatically — tag it as business income and assign a category. Track the payout amount you actually receive as your income. If you want a separate view of gross revenue versus net cash, record the platform fee as a separate expense (category: Commissions and Fees or Other Business Expense) so the gross-to-net difference is captured.
If the platform combines several jobs into one payout, use the transaction's notes field or assign a client to track which jobs are bundled. At year-end, the platform issues a 1099-NEC for the gross earnings (over $600); your Money Pro income should match that 1099 figure when fees are recorded as expenses.
How do I record cash income from a client who paid me directly?
If you deposited the cash into your linked bank account, the deposit syncs automatically — categorize it as business income. If you kept the cash on hand without depositing, add it manually: Money In → Add Income → enter the amount, date, source, and category. Don't double-count: never record both a manual cash entry AND a bank deposit for the same money.
Related Articles
Still need help?
Reach us via live chat on your dashboard or our support team. We're available Monday–Friday during business hours.